aiobservabilitydeveloper-tools
AI agents removed the friction from writing telemetry
I used to avoid adding telemetry because it felt like tedious busywork. Now with Claude handling the OpenTelemetry boilerplate, I'm instrumenting everything.
Today, we have a guest newsletter from my friend Igor Luchenkov! Igor is a staff software engineer at Clarify as well as one of the founders of Hackathon Party. He recently open-sourced a package called storybook-addon-test-codegen that autogenerates tests for you based on your interactions with your own components.
--
After @storybook/addon-interactions were introduced to Storybook, people started to truly understand the value of component tests. These tests don’t rely on a naive JSDOM implementation. Instead, they render components in a real browser environment.
This means that when a test fails, you aren't confronted with a wall of hard-to-parse HTML, like in the screenshot below:
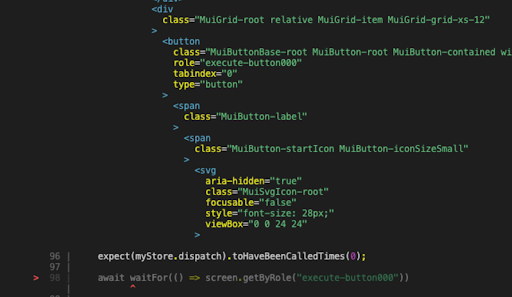
Instead, you're shown the actual component, making it much easier to understand why the test failed.

So, I started writing component tests.
Compared to end-to-end (E2E) tests, component tests are far more valuable. Once you add E2Es to your system, you sign up for a few hours each week fixing them because they constantly break. Their two major flaws, flakiness and time it takes to run them are good reasons to think twice before relying on them. But wait, I'm supposed to be writing about component tests, not end-to-end tests...let’s get back on track!
As you write more component tests in Storybook, you start to notice a familiar pattern:
userEvent statementIt's manual. It's repetitive. Is there a way to automate it? There is, indeed!
Introducing: storybook-addon-test-codegen

With this addon, all you need to do is hit the “Record” button and interact with your story. As you click, type, and perform other actions in the Storybook UI, the addon automatically generates test code for you.
Need to add an expect statement to check visibility, value, or whether something is enabled/disabled? No worries! You can do that too. Just click “Add assertion,” select an element on the page, and choose the assertion you’d like to add.
Once you're done interacting with the story, you can either copy-paste the generated code or click the “Save to story” button to automatically update the story source code with the new play function.
I ran a little experiment: I wrote a story for a new component I built. It included a dropdown, an input, and a button.
Now consider how many tests you write for each component to cover all interactions. The compound benefit is massive!
For the curious, here’s how it works under the hood:
When in recording mode, the addon listens for events like pointerdown, input, focus, etc.
For each event, it determines the best selector for the target element
findBy* queries work in Testing Library: first check for an aria-role, then label, title, placeholder, etc.It saves the optimal selector along with the event details into a list of events
Some of these events get “squashed” together
type "A" and type "B" into the same input become type "AB"Finally, the squashed list of events is turned into code using string concatenation
If you want to dig deeper into how it works, check out the addon’s GitHub repo, or reach out to me on LinkedIn.
I used to avoid adding telemetry because it felt like tedious busywork. Now with Claude handling the OpenTelemetry boilerplate, I'm instrumenting everything.
AI agents work better when given appropriate context and guardrails.
I've been using Claude Code to offload tedious parts of platform engineering: dependency reviews, generating test PRs, dependency migrations, and project cleanup.